A calendar app is practically an essential tool of the modern world. As great of a default option as Apple Calendar already is, you can actually kick things up a notch with a few features and tricks in mind.
And it’s not just because it’s the easy option to keep your default Mac’s Calendar app. Just beneath the surface, there is genuinely untapped potential for users looking to maximize productivity or better organize their time.
What is a calendar and what is a calendar app?
Although it might sound like a minute difference, there’s actually quite a vast distance between a calendar and a calendar app. A calendar app is an application you can use to access and view your calendars. Using a calendar app, you can add events to a calendar, create new calendars, set-up and receive notifications, and undertake all functionality you intend to use with a calendar.
A calendar, in the context of using an app, is a continuous view of the day, week, month, or year that can have various events added to it and can even be shared with others. Within a calendar app, you can house multiple calendars for various parts of your life. This can be as simple as having a calendar for personal items and a calendar for work.
Going a step further, not all calendars apps are quite created equally. Some, like Apple Calendar, use their own calendar database. Other calendar apps that have their own database include Google Calendar and Outlook. On the other hand, some calendar apps simply use other pre-existing databases.
Adding and using calendars
The first way to step up your Apple Calendar game is to create separate calendars. Apple Calendar launches with one calendar ready for any new user to use, but creating mulitple calendars can be useful for a number of different reasons.
With multiple calendars, you easily separate different portions of your agenda and keep a much more streamlined overview of your schedule. This can be as simple as keeping a calendar for work and for personal matters, or as intricate as keeping separate calendars to remind yourself of bills, appointments, and really anything you can think to section off.
Adding a new calendar can be done in a couple of different ways within the Calendar app.
Adding calendars is a great way to organize your schedule beyond just keeping a basic agenda in Apple Calendar.
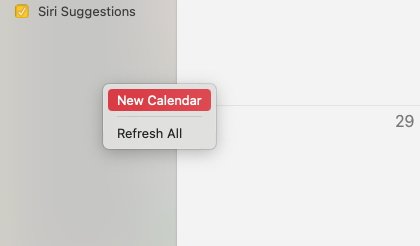
- Right-click within a blank space in the sidebar.
- Click New Calendar.
- In the menu bar, select File.
- Beneath File, select New Calendar.
- Choose whether the calendar will be on your Mac exclusively or on iCloud.
You will generally want to keep calendars on iCloud, so that they are accessible across all of your devices. When creating a new calendar at all, Apple Calendar will default to creating it in iCloud, but there is a very small area you can right-click just below the “Other” section of calendars that will default to creating a calendar on your Mac.
With a new calendar created, it will show up in your sidebar. With multiple calendars in your sidebar, you can drag and drop calendars to reorder them, toggle a calendar’s visibility, and merge calendars. Merging calendars can be done quickly and easily by dragging a calendar and dropping it on another calendar’s name.
All of these functions can be incredibly useful. If you need two easily toggled overviews for your work agenda and your personal agenda, you can easily create a separate calendar for each and toggle between them at will.
And, if you find yourself with two calendars that have began to overlap in purpose, merging them allows you to retain one calendar rather than two. And you can keep merging if you have more than just two that need to be combined.
Adding calendars from other services
For users new to the Apple ecosystem, or Mac users wanting to switch to Apple Calendar from another provider, one of the most useful functions available within Apple Calendar is adding calendars from other service providers, such as Google, Yahoo, or Microsoft. Doing so involves the same process as syncing info from any non-Apple service to your Mac.
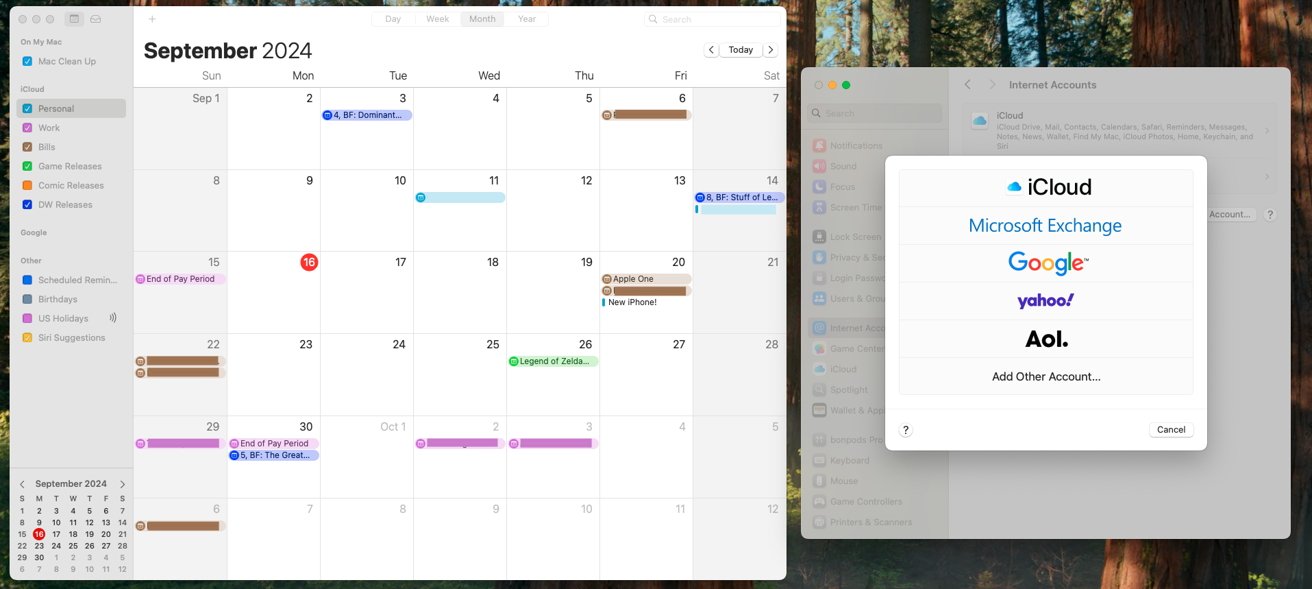
- Open System Settings.
- Select Internet Accounts.
- Select Add account
- Select your service of choice, and add your account.
Once you have an account added, you’ll be able to selectively sync various services, such as emails, contacts, calendars, and notes, from that account across macOS. In the Calendar app, these calendars will pop up in your sidebar, and be under their own heading for their service of origin.
Share calendars for cooperative efforts
One final tip for maximizing the usefulness of your calendars is being able to share them. There are two ways you can share your calendar: a more private, collaborative sharing, or a public calendar that can be viewed by many.
With a privately shared calendar, you can coordinate and collaborate with teammates or friends and family. Everyone with access to the calendar can modify the calendar just the same as any other, which can be fantastic for collaborative efforts and scheduling.
A public calendar, on the other hand, is a simple view-only calendar that you can share a link to. This can be great for people that need to maintain a public schedule, or for keeping a readily available schedule for large groups of people.
Either of these sharing options can be accessed very easily in just a couple of clicks.
- Open the Calendar app.
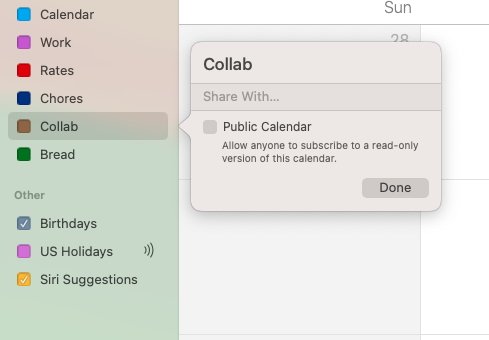
- Right-click on an individual calendar.
- Select Share Calendar
After opening up the share calendar menu, you can add in any contacts you wish to share your calendar with. Alternatively, you can simply tick the box to make your calendar public and begin sharing the link.
Adding events
Other than taking a look at a digital calendar, the primary function of a calendar app is putting events on a digital calendar. Creating events within Apple Calendar is exceedingly easy, and you have a few different ways to do so.
- Right-click at any point in your calendar view.
- Click New Event.
Creating an event this way will simply place an event in the day you right-clicked. If you’re in the more granular week or day view, your event will be placed at the time you right-clicked.
With the event placed, you’ll be greeted by a window that, at its simplest, allows you to name an event as well as change what calendar the event is in and modify the date and time of the event. By default, whatever calendar you currently have selected in the sidebar will be the calendar your new event is inserted into. However, there is a slightly different way to go about this process.
- In the menu bar, select File.
- Beneath File, select New Event or Reminder.
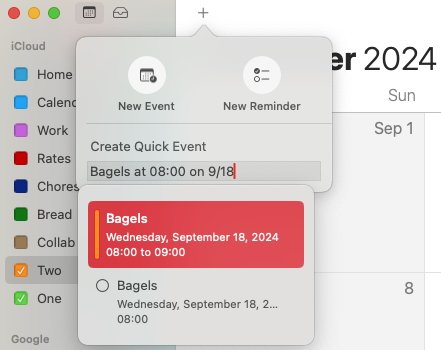
Additionally, you can click the +’ icon just above the month, or you can simply press Command+N. Either of these two methods will have the same result as going through the menu bar, which will open up a small menu. From here, you can either click “New Event” to set a generic event into whatever day you last clicked on, or you can utilize the “Create Quick Event” box.
Adding a quick event offers a great way to simply type out an event and let Apple Calendar do the rest of the work.
The “Create Quick Event” box allows you to quickly type in the basic gist of an event, and have Apple Calendar do the rest of the work. In the box, you can type in something along the lines of “lunch date at noon on 10/23” and Apple Calendar will create an event called “lunch date” at 12pm on October 23. Anything beyond the name, date, and time of the event cannot be set using the quick event box.
Adding event attachments
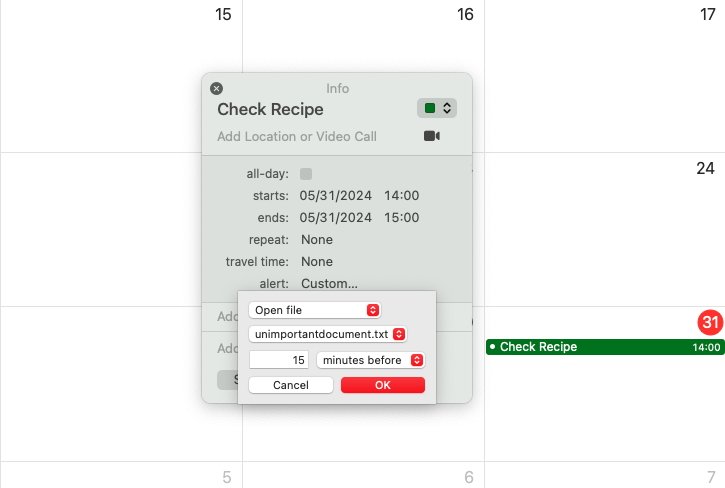
One of the best ways to soup up your events is to add attachments to them. This can include attaching URLs, and files to a time specific even. If you have a Zoom meeting scheduled at a certain time, you can have Apple Calendar prompt you to open Zoom on time for the meeting. Or, if you need to view or modify a document at a specific time, you can make attach that file directly to a calendar event and even have it open when the event starts. And the same goes for URLs.
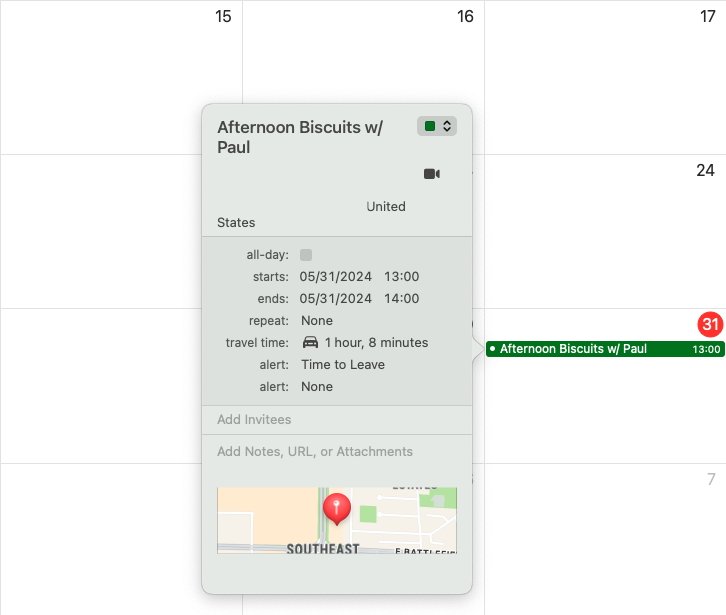
Further still, you can also attach locations to an event. With locations attached to an event, you can make Apple Calendar remind you to leave at the exact time you need to, based off of an Apple Maps ETA.
- Open the Calendar app.
- Create or modify an event.
- Select Add Notes, URL, or Attachments OR select Add Location or Video Call.
Utilizing attachments, you can optimize your scheduling and efficiency. Whether that be for getting you out the door on time, or by opening up an app or URL you might otherwise forget to open on time.
When to use third-party calendar apps
Despite the robust nature of Apple’s Calendar app, your needs still might be better fulfilled by a third-party alternative. There are more than a few reasons you might prefer to use something like Fantastical or even Google Calendar.
Fantastical offers a more advanced user experience, with an optional subscription for more features.
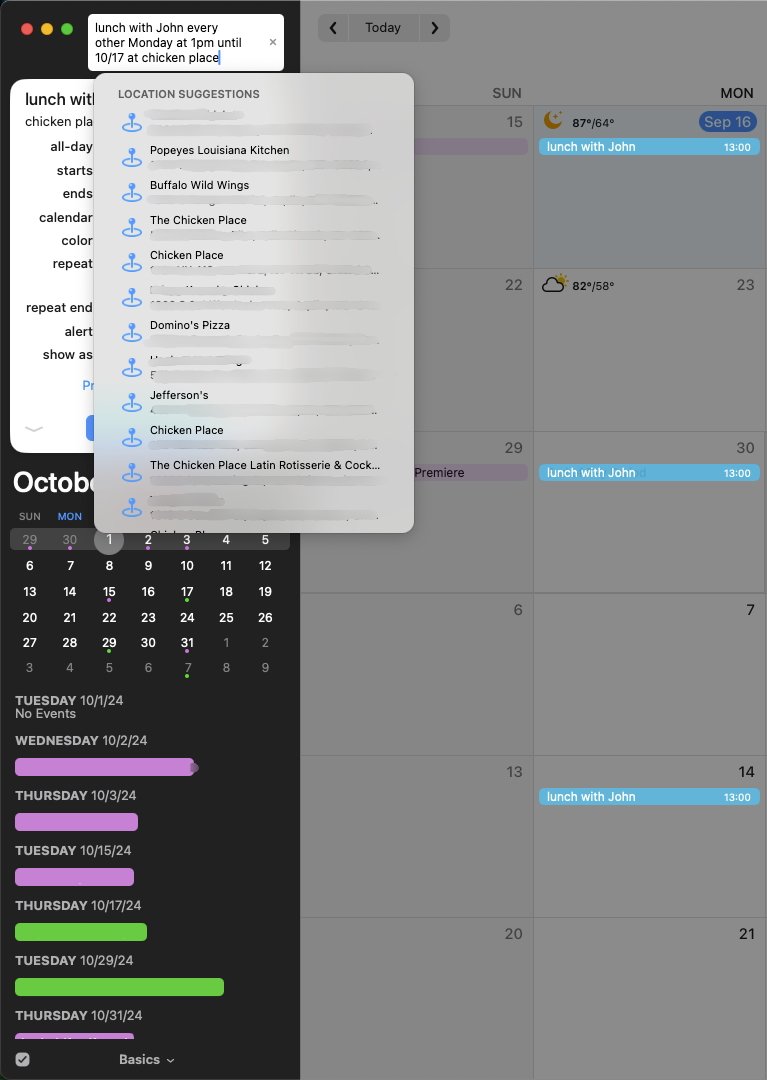
Something like Fantastical can be great if you’re wanting a much more fleshed out version of the quick event box from Apple Calendar. Whereas the quick event box in Apple Calendar can be fairly simplistic, Fantastical’s event adding box can handle much more complex events. If you were to type in “lunch with John every Monday at 1pm until 10/17 at restaurant x,” Fantastical would fill in that event, every Monday through October 17 at 1pm, with the location of the restaurant attached.
Granted, attaching the location would require you to subscribe to the premium version of Fantastical, which costs $6.99 monthly.
Even better, as you type out your event, you will see it update on your calendar in real time. There are other perks to Fantastical as well, such as seeing the weather on your calendar, that all come together to make a fantastic user experience that Apple Calendar just can’t match right now.
Another reason you may prefer to use something else is if you happen to pay for a software suite that includes a calendar app, such as the $12.99/month Proton Unlimited or the $6.99/month Microsoft 365. If you already happen to be paying for a calendar app, it can make sense to stick to using that app.
Apple Calendar is a genuinely great service. With a handle on some of its most useful features, there’s very little Apple Calendar you can’t do in terms of actual scheduling and planning. For those heavily invested into the Apple ecosystem, you’ll have no issues utilizing Apple Calendar across all of your devices.
